Clean, sharp-edged stones and the correct resin mixture are vital for a sturdy resin-bound gravel surface. Mix at least 7% resin by weight with your aggregates—rather like getting the right cement mix for concrete. Before laying, ensure your surface is spotless and patch any cracks, much as you would before painting a wall. Apply the resin in thin, even layers, similar to varnishing wood. These basic steps, done properly, prevent loose stones and ensure your driveway or path stays intact through British weather. If in doubt about ratios, it’s worth checking with your supplier, as different stones need slightly different amounts of resin.
Key Takeaways
Strong, stable resin-bound gravel installations need:
- At least 7% resin content by weight – crucial for proper stone bonding and UK weather conditions
- Sharp, angular aggregates rather than rounded stones – they lock together like a jigsaw
- Spotless surface preparation – much like painting, fill every crack and hole beforehand
- Correct depth for each area – driveways need 18mm, paths can manage with 15mm
- Regular once-over checks – sort any loose stones straight away, just as you’d fix a wobbly paving slab
These basics prevent most loose stone issues commonly seen in British installations. Think of resin-bound gravel like building a wall – each element needs to be properly placed and secured to avoid future problems.
Importance of Proper Mixing Techniques

Proper mixing is crucial for a lasting resin-bound gravel surface. Use either a paddle mixer or forced action mixer for the best results.
First, mix Part A for 10-20 seconds, then add Part B and blend for roughly 60 seconds until you’ve got a creamy mix. Ensuring that the resin is bone-dry is vital for optimal bonding.
Keep moisture out at all costs – it’ll ruin your resin. When adding stones, start with a third of your aggregate, pour the resin into a well, then fold in the remaining stones.
Stick to consistent mixing times and methods to avoid patchy colours and ensure even coverage. This attention to detail makes all the difference between a top-notch finish and a botched job. Additionally, remember that a reliable forced action mixer is essential for achieving the best mixing results.
Correct Resin and Aggregate Ratios

Achieving proper resin-to-aggregate ratios remains crucial for durable resin-bound surfaces. Use at least 7% resin by weight for optimal bonding – much like getting the right mix for a cake recipe. Different aggregates might need slight adjustments, but this baseline ratio ensures stones stay firmly in place whilst maintaining surface integrity. A quality aggregate can further enhance the longevity of the installation. A well-balanced mix today means fewer loose stones and repairs tomorrow. Additionally, proper ground preparation is essential to ensure that the resin and aggregate can bond effectively.
Optimal Resin Ratio
Getting the resin ratio spot-on is crucial for a lasting resin-bound gravel surface. Use at least 7% resin to total aggregate weight for the best results.
Whilst different stones might need slight tweaks, always check the manufacturer’s guidelines. Think of it like making porridge – too much liquid makes it sloppy, too little leaves it dry and crumbly. The same goes for resin mixing; excess creates sticky patches, whilst too little means loose stones.
For proper mixing, use a forced action mixer – it’s like a cement mixer on steroids, ensuring every stone gets properly coated. Additionally, ensure the base materials are suitable for the intended use to enhance the durability of the installation. An improper resin ratio can lead to weak surfaces and increased risk of loose stones, which ultimately shortens the lifespan of your installation.
Keep in mind that weather conditions might mean adjusting your mix slightly. Measure carefully and mix thoroughly, and you’ll end up with a surface tough enough to handle British weather for years to come.
Adjusting Aggregate Types
Selecting the right aggregate mix is crucial for a lasting resin-bound surface. Start with clean, dust-free aggregates – much like ensuring a clean canvas before painting.
Combine fine aggregates (1-3mm) with coarse ones (2-5mm) in equal parts to create a solid foundation. Think of it as building a brick wall: the smaller stones fill the gaps between larger ones, creating a stronger structure.
The size of your aggregates affects how much resin you’ll need. Larger stones need a thicker resin coating, whilst smaller ones require less. A proper mix prevents loose stones and offers better grip, rather like how a well-designed tyre tread works on wet roads.
Remember to adjust your resin quantities based on your chosen aggregate blend. This careful balance ensures your surface stays intact and smooth throughout British weather conditions.
Selecting the Right Aggregate

Choosing Suitable Aggregate
Select sharp-edged stones rather than smooth, rounded ones for your resin-bound gravel – they’ll grip together like pieces of a jigsaw, creating a firmer surface.
Think of it like building with Lego bricks rather than marbles. The stones must be thoroughly clean and dry before mixing with resin, much like preparing a wall before painting.
Skip these steps, and you’ll risk stones breaking loose over time.
Angular Versus Rounded Stones
Choosing the right stones for resin-bound gravel makes a real difference to your finished surface.
Angular stones work best because their jagged edges lock together firmly – think of a jigsaw puzzle. This means they stay put, particularly useful for sloped driveways where loose stones could be a nuisance. They also cope better with Britain’s changing temperatures.
Rounded stones might look smoother, but they’re not ideal. Much like trying to build with marbles, they tend to roll and shift about. While they’re easier to lay initially and can look quite nice in garden paths, they’re not the best choice for areas where cars will park or drive.
For a lasting, low-maintenance surface, angular stones are your best bet. They’ll give you a stable surface that won’t need constant touching up, saving you time and money in the long run.
Aggregate Size Variations
Selecting the right aggregate size is crucial for a stable resin-bound gravel surface. For optimal bonding, combine 2-5mm and 1-3mm stones – the smaller pieces fill gaps between larger ones, creating better grip and fewer loose stones.
Mix one part resin to three parts aggregate by weight to ensure thorough coating. The surface needs a minimum 15-18mm depth for proper coverage, much like laying a solid foundation for a garden path.
A well-balanced mix of aggregate sizes creates a strong, permeable surface that handles both foot traffic and British weather. Think of it as building a jigsaw puzzle – the different-sized pieces work together to form a robust, lasting finish.
Clean and Dry Aggregates
Clean, dry aggregates are essential for a quality resin-bound gravel surface. Your stones must be free from dirt, dust and organic matter to ensure they bond properly with the resin.
Think of it like painting a wall – you wouldn’t paint over a dirty surface, as it wouldn’t stick properly.
Make sure your aggregates are thoroughly dried before use. Any moisture will weaken the resin mix, much like adding too much water to cement.
Damp stones can lead to loose patches and poor adhesion, causing problems later on.
For best results, either clean your aggregates yourself or buy from trusted UK suppliers who pre-wash their materials.
Getting these basics right will give you a durable, attractive surface that lasts for years.
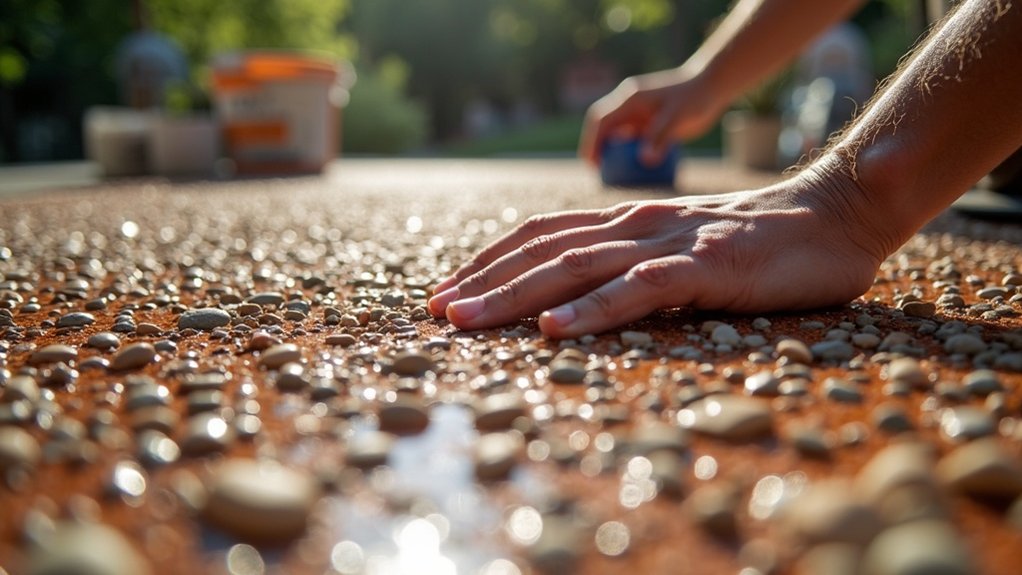
Preparing the Surface for Resin Application

Clean surface preparation is vital for resin-bound gravel installation. First, remove all dirt, grease and stains – think of it like preparing a wall before painting.
Give the surface a thorough power wash or scrub to open up the pores, much like cleaning your patio.
Sort out any cracks by filling them with repair mortar – these weak spots could cause problems later if left untreated.
Make sure the base is properly compacted (you shouldn’t see any movement when walking on it) and check the slopes allow water to drain properly.
If your surface needs it, apply a primer and let it dry completely. Think of this like using undercoat before painting – it helps everything stick better.
Lastly, clear away any weeds or loose bits that might interfere with the resin bonding.
Getting these basics right will save you headaches down the line and ensure your resin surface lasts for years to come.
Best Practices for Application and Curing

Proper application depth and even resin distribution are crucial for a lasting resin-bound gravel surface.
Much like spreading butter on toast, the mixture needs consistent coverage to prevent weak patches and stone loss.
The curing process requires patience – rushing it’s like trying to drive on wet concrete.
Allow proper setting time, particularly in British weather where moisture and temperature can vary significantly.
Proper Depth Application
Proper depth is crucial for a lasting resin-bound gravel surface. For pedestrian areas, apply at 15-18mm depth, whilst driveways and parking spaces need 18-20mm. Uneven or soft ground requires 30-40mm depth for stability. Your aggregate depth should be three times the size of your largest stone – think of it like building layers of a sandwich.
Always start with a solid foundation: a well-packed MOT Type 3 sub-base between 100-250mm thick. Adding a geotextile membrane helps prevent sinking and movement, much like laying a strong tablecloth before setting the table.
Keep the thickness even across the whole area – patchy application leads to loose stones and weak spots.
Once laid, let it cure properly without any traffic. Getting these basics right means you won’t be fixing problems later.
Even Resin Distribution
Even resin distribution is vital for a long-lasting, attractive resin-bound driveway or path. Use a forced action mixer to properly coat your aggregates – this isn’t a job for a standard cement mixer.
Mix at a ratio of 3:1 (aggregate to resin) by weight, much like making a proper Yorkshire pudding batter where proportions matter. For mixed-size stones, adjust the mix slightly to ensure all pieces get proper coverage.
Spread with a flat trowel using steady, even strokes – think of icing a cake – but don’t over-work it, as this traps air bubbles. Keep your work area clean and sheltered from leaves and debris that could spoil the finish.
Check your work regularly as you go along. It’s far easier to sort out patchy areas straight away than deal with loose stones later.
Adequate Curing Time
Proper curing time is vital for resin-bound gravel success. Allow 24-36 hours for light vehicle use, though this varies with weather conditions.
In warm summer weather, surfaces may cure in 6-12 hours, whilst cold temperatures significantly extend this period.
Protect the surface from rain and strong winds during installation and initial curing. Keep all traffic off until fully cured to avoid surface damage.
Mix materials in stable conditions – temperature swings can cause uneven curing and affect the final result.
The Role of UV-Stable Resins

UV-stable resins are vital for long-lasting, attractive resin-bound gravel surfaces. Using aliphatic polyurethanes ensures your surface won’t yellow or fade in sunlight.
Think of these resins as a protective shield – they keep the surface from becoming brittle or breaking down, even with Britain’s varied weather conditions.
These specialised resins are particularly valuable for outdoor installations across the UK, where surfaces face constant exposure to the elements. They lock stones securely in place whilst maintaining their original colour, much like a quality outdoor paint that keeps its finish.
The result? Your driveway or patio stays looking fresh and performs well year after year, with minimal upkeep needed.
It’s a practical choice that pays off in the long run, saving both time and money on repairs.
Ensuring Adequate Depth in Applications

The right depth is crucial for a lasting resin-bound gravel surface. For pedestrian areas, lay 15-18mm deep, whilst driveways need 18-20mm. Tricky spots like tree surrounds require 30-40mm for stability.
Always check your base is properly compacted – a wobbly foundation means loose stones later. A good rule of thumb: your depth should be three times the size of your largest stone to ensure proper bonding.
Keep the depth even across the whole area; any shortcuts will show up as weak spots or patchy areas down the line.
These measurements aren’t just numbers – they’re the difference between a surface that lasts years and one that needs constant repairs. Think of it like laying a carpet – you wouldn’t skimp on underlay thickness, would you?
Multi-Coat Applications for Enhanced Bonding

Multi-Coat Applications for Enhanced Bonding
A durable resin-bound gravel surface benefits significantly from multi-coat applications to strengthen bonding and prevent loose stones.
Key advantages include:
- Better Adhesion: Each layer creates a sticky surface that bonds more effectively with the next coat, keeping stones firmly in place.
- Even Stress Distribution: Multiple layers spread weight and impact across the surface, reducing damage risks and extending the surface life.
- Gap Filling: Extra coats fill tiny spaces between stones, much like grout between tiles, protecting against wear and tear.
For best results, follow the manufacturer’s guidelines on coating thickness and timing between layers.
Think of it like painting a wall – multiple thin coats produce a stronger finish than one thick layer.
Proper application ensures your resin-bound gravel stays intact and hard-wearing for years to come.
Engaging Professional Installers

Choosing the right professional installers makes all the difference with resin-bound gravel surfaces. Check their credentials, particularly their track record with resin-bound projects and relevant UK certifications.
Any decent installer will begin with a proper site survey, checking the ground conditions and how water drains from the area. It’s crucial they understand the nuts and bolts of sub-base preparation – much like building a house, the foundations matter most.
Look for installers who know their stuff about mixing ratios – too much or too little resin can spell trouble down the line. They should provide a clear plan that covers everything from surface levels to edge details.
Think of it like baking: the right measurements and method are essential for the perfect result.
Quality installation might cost more initially, but it’s worth every penny to avoid loose stones and drainage problems later. A well-installed resin-bound surface can last for years with minimal maintenance – that’s the sort of investment that makes sense for any property.
Regular Maintenance and Inspection

Regular Maintenance and Inspection
A well-installed resin-bound driveway needs proper upkeep to last. Three key maintenance tasks will keep your surface in good nick:
- Monthly Clean: Simply brush away leaves and rubbish, particularly during autumn when fallen leaves can stain.
- Yearly Wash: Give it a gentle clean once or twice a year with low-pressure water to protect the resin bonds.
- Quick Checks: Look out for any loose stones or small cracks – sort these early to prevent bigger problems.
Keep an eye on your surface during routine garden maintenance. Spotting and fixing small issues straight away saves both time and money in the long run.
Customizing Installation Practices for Specific Conditions

Getting resin-bound gravel right means adapting to your site’s unique needs. Choose either concrete or compacted gravel as your base, depending on what you’re using it for and how water needs to drain.
Sort any cracks first – they’ll only cause trouble later. For solid bases, make sure you’ve got proper drainage gaps.
Pop in some flexible edging to keep everything in place whilst it sets. With the mixing, follow your manufacturer’s guidelines to the letter, but keep an eye on the temperature as it affects how quickly things set.
Lay it 15mm to 18mm thick across the board, and watch the weather – you’ll want dry conditions for proper setting.
Mind the British weather – avoid laying in the rain or when it’s too cold, as this can mess with how well it sets.
These practical steps will give you a proper job that lasts, with no loose stones to worry about.
Frequently Asked Questions
Can I Use Different Brands of Resin and Aggregate Together?
Mixing resin and aggregate from different manufacturers isn’t advisable for UK installations. Different brands often have unique chemical compositions that may not work well together, much like mixing oil-based and water-based paints. Poor compatibility can result in weak bonding, leading to loose stones and patchy surfaces – particularly problematic in British weather conditions. Stick to products from the same manufacturer to ensure your driveway or patio performs as intended.
How Does Weather Affect Resin Curing Times?
Temperature and humidity significantly affect resin curing times in the UK climate. Cold temperatures slow down the chemical reaction, whilst damp conditions can leave surfaces tacky and imperfect. For best results, work in room temperatures between 20-25°C – about as warm as a pleasant spring day. High humidity above 70% (common in British winters) can interfere with proper curing, much like trying to dry paint on a rainy day.
What Tools Are Essential for Resin-Bound Installation?
Essential resin-bound installation tools include forced action mixers, steel trowels, and finishing trowels. A forced action mixer ensures proper blending of resin and aggregate, whilst hand trowels help achieve that smooth, professional finish common in British driveways and paths. Quality tools, paired with proper mixing technique, make the difference between an amateur and professional result.
How Can I Identify Poor Quality Aggregates?
Poor quality aggregates can be spotted through visual inspection and basic testing. Check for visible cracks, inconsistent sizing and unwanted materials like clay or organic matter. Proper aggregate selection is crucial for construction quality and durability. Common signs include:
- Crumbly or weak particles
- Excessive dust content
- Uneven or poorly graded sizes
- Discolouration
- Presence of foreign materials
A simple hand test can reveal loose material or excess dirt. Reputable suppliers should provide test certificates and material specifications upon request.
What Are the Signs of UV Degradation in Resin?
UV damage reveals itself through fading colours, yellowing and loss of shine in resin surfaces. Check for tiny cracks and rough patches – these telltale signs show the resin is breaking down, which will affect its strength and function as time goes on.
Conclusion
A well-installed resin-bound gravel surface should remain stable and free from loose stones. To achieve this, ensure proper mixing ratios between resin and aggregate, maintain consistent temperature during installation, and allow sufficient curing time. Use high-quality UV-stable resin and correctly graded aggregates from trusted UK suppliers. Just as you wouldn’t rush making Yorkshire puddings, take care with each installation step – proper preparation prevents future maintenance headaches. Regular inspection and prompt repairs of any small issues will keep your surface looking smart for years to come.